Slow and steady wins the race. That’s what I had to keep reminding myself when I became overwhelmed by the tasks ahead of me as soon as I realized our little Taiter* Tot was on his way. Surprisingly (to myself at least), I have been unexpectedly laid back about getting everything set up for Eli’s arrival. I am now three days away from Week 39 (a/k/a full term – AHH!), and I only now feel like the nursery is move-inable — not completely done, but definitely move-inable. (I used that word twice; it is now totally legit.)
Now okay, I’m not going to delude myself into thinking that I’m doing this for my son. He probably won’t remember much of how this room looks (well, now that I’ve taken a picture of the room, he likely will). Plus, by the time he is old enough to have his own opinion, I doubt this is the design he would pick for the room. So really, this is a room I designed for myself. And Ben. But really, myself. (Thanks for letting me have my way, Ben.) I’m really happy by how the nursery is a mix of old and new, with personal touches everywhere, while not being overly expensive. Here’s how we did it.
The Game Plan
Color Scheme
I wanted the room to be peaceful. I have always loved gray walls. In fact, I repainted the living room two years ago, changing it from beige to gray, and I still love it. (I was not particularly fond of the beige.) I also knew I would avoidat all costs the stereotypical blue-for-boys, pink-for-girls color scheme. Seriously — I want to bonk the head(s) of whoever decided it would be wise to compartmentalize things into boy and girl colors. It makes my skin crawl. Have I mentioned the parents Ben and I met several years ago on Halloween when we were handing out playdoh to kids? They forced their toddler son to put back the pink playdoh, and when he reached for the same color again, they smacked his hands and said, “Boys don’t play with pink!” [Insert steam-blowing-out-of-ears emoticon here.] But I digress.
Reuse
I also wanted to get away with buying as few things as possible, reusing what we already had. This was partly for financial reasons, but also because it just seems inauspicious to welcome a new person into the world by creating more junk for the environment (especially when things are in working condition). So here’s what we were able to reuse:
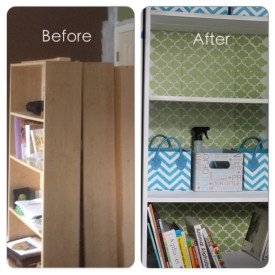
- IKEA bookshelves — re(spray)-painted to white. Maybe less time-consuming to just buy new white ones, but that whole thing about trash…yeah. The cool part was that we MarthaStewart-stenciled the backboard of the shelf with a cool Moroccan design. It surely was a good thing, except for the fact that I gave up around the edges because I couldn’t stick the stencil in there. I probably should’ve taken off the back, but I didn’t want to deal with restapling it back onto the wood shelf.
-

I realize the dresser is not really visible in this picture. Just try to peek through the crib! You can see more of the dresser in the curtain picture later in the post!
a dresser my sister bought from an antique store several years ago. Thank GOODNESS she repainted that dresser a beautiful, glossy white (well, really, I should thank HER). As I recall, it was quite hard work, but she did a beautiful job restoring it, and it looks perfect in the nursery. It is also our changing table. I also repainted the base of the lamp on the left of the dresser (it used to be ivory), so it would coordinate with the new lamp on the right that I bought from Family Dollar (I think it was $10?). I put washi tape on both lamp shades to make it not seem too mismatched, but I actually like that the two lamps are not too matchy-matchy. Or maybe I’m just rationalizing! 🙂
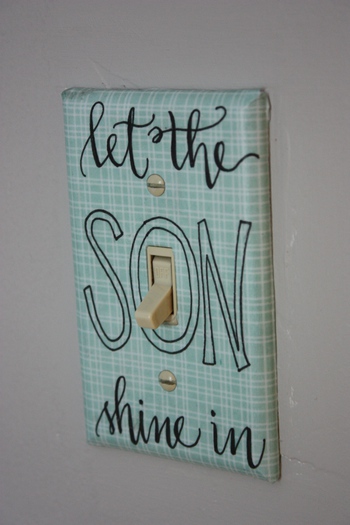 • outlet covers/switchplates – the old beige covers were clashing with the gray walls, so I learned how to modge podge the covers with scrapbook paper. So easy — and I could even write on it! (I’ve gotten into calligraphy lately, so it was fun to personalize some of the covers.)
Reduce
Where we had to buy new things, my goal was to spend as little as possible on those purchases. Seriously, I didn’t realize how expensive things can get for these scrawny sprouts! So here’s where we reduced the amount of money we would have otherwise spent:
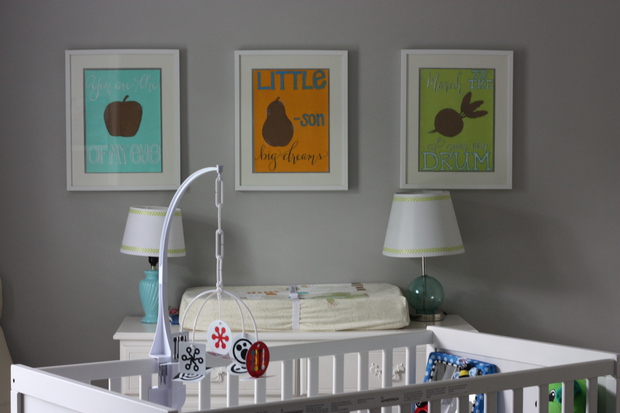
- Artwork: Have you ever browsed nursery art? It’s cool that it can be personalized and all, but it was hard to justify spending over $50 per painting. So, I set out to do my own artwork. I suck at drawing, but I think I’m pretty okay at calligraphy. I also wanted a fruit/vegetable/food theme for the artwork. (I’m obsessed about food; I’m always thinking about it.) This is what I came up with:
-
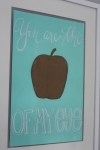
- You are the [apple] of my eye.
-

- Little [pear]-son big dreams
-
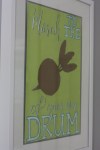
- March to the [beet] of your own drum.
Don’t gape yet — the artwork is not done! I drew the shapes of the fruits/veggie on a cereal box and cut them out, so I could have the proportions and text placement correct. On the day Eli is born, I’m going to send Ben out to get a copy of the newspaper. I plan to use the template to trace the pattern from the newspaper and use watercolor so the news text is still visible underneath. So imagine a red apple on the blue, a green pear on the yellow/orange, and a purple beet on the green background. I think it’ll look good! (Assuming I get around to it once the baby arrives…)
- Curtains: I asked Ben to reposition the old curtain rod, which was placed for 84″ curtains, and move it higher, so we could have 95/96″ curtains. It makes the small room look a little bigger. I spent an embarrassingly long time looking for curtains that would look good against the gray wall. At first I thought I would pick one of the accent colors (blue, green, or yellow) as the curtain color. But then I thought it would make the room feel closed-in to have such a bold color. I decided white needed to be the main color, but it’s hard to find white curtains that block out light. I really wanted the room to be slumber-inducingly dark.
Then, I found something I loved from Crate & Barrel —

— for a measly $99.95 (+5.3% tax)! And although the curtain was lined, I do not believe that it was a blackout curtain. No, that would not do. So I found a $10 white curtain on Amazon, and I freakin’ painted the curtain with the gray paint I had leftover from the wall. At first, I was considering using stencils, but I remember how hard it was (for me) to position the overlapping pattern correctly. So painter’s tape + ruler and a brush roller, and I was a pretty happy camper. I bought a blackout liner to place behind the curtain, and I think the curtain looks decent! I wish it weren’t so shiny, but who am I to complain when I got the curtain at such a reasonable price? By the way, the blackout liner works so well that, although I took the picture at midday, I had to turn on the lights in the nursery!
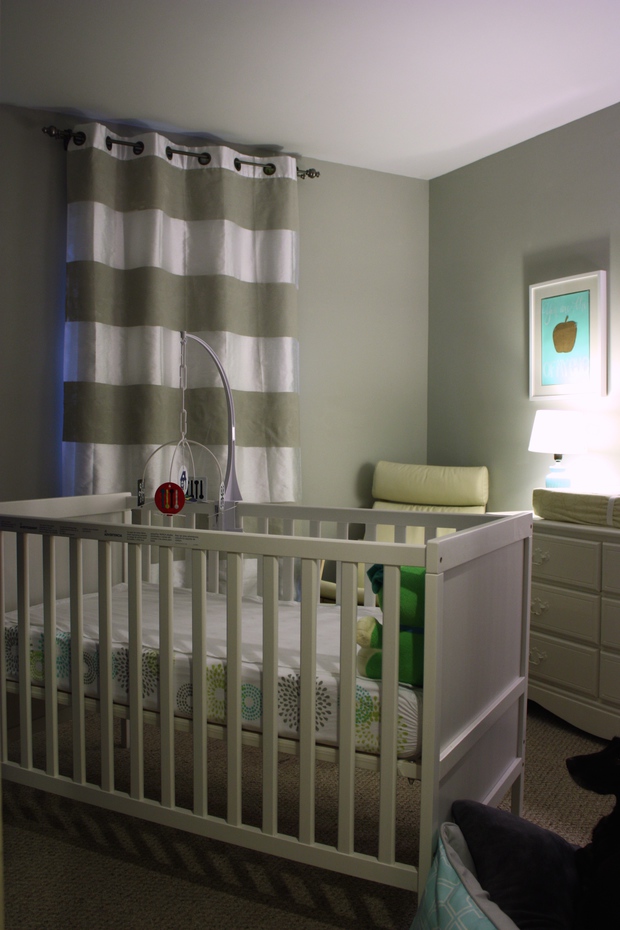
Notice Riley already playing the role of the dutiful guard at the foot of the crib. Of course, her brand spankin’ new dog bed may be enough of an incentive! And there’s another peek at the dresser!
Improvise
For all the things I had to buy but couldn’t get the exact version envisioned, I just relied (see what I did there? rELIed? Get it? …sorry…) on my good ol’ noggin. While I wanted the room to be calming, I still wanted some color and playfulness. I figured a good way to add some color would be with the crib sheets. I spent a long time considering the bedding for our budget IKEA crib; there are SO MANY cute prints out there these days.
But then, a dear friend, who became a mother two years ago, made my decision easier for me. She introduced me to a revolutionary crib sheet, the QuickZip Sheet, which only requires me to zip on/off the top part of the sheet. The side of the mattress stays put, and since the baby will only be sleeping on the top part of the sheet, it is unlikely that I’ll need to wash the side as often. This saves me the trouble of having to lift up the mattress every time I need to change the sheets. So cool.
The only problem is that the sheets were mostly solid colors, not cute prints.
 Sheets: I decided to order the white sheets and stencil a design on the side using acrylic paint mixed with a fabric medium. This makes the fabric soft and washable, although technically, the softness doesn’t matter because Eli’s body won’t be touching the side anyway. But it’s nice to know it can be done, and I love this personalized touch — I now have a QuickZip sheet design nobody else has (unless they bought the same Martha Stewart stencils I did)!
 Bunting: I wanted Eli’s name somewhere in the room. Can I just say that one of the reasons I’m excited that Eli is not an uncommon name is because he’ll be able to find novelty items with his name on them? I always pine after those cute license plates souvenir keychains, but good luck finding one that says “Pitiya” on it. Though there are some reasonably-priced buntings, I wanted to personalize mine with the same colors as the paintings and my handwriting. It’s hard to tell, but the outline for the white letters match what will eventually be the color of the fruits/veggie. (Red outline on blue flags, green on yellow, and purple on green.) I found balsa wood pennants from Michaels. At 99¢ per pennant, the purchase was a pretty good deal with my 15% teacher discount.
Side note: It took time for Ben to warm up to the idea of a bunting — but only because he doesn’t like the word “bunting.” Ben apparently does not like verbs being gratuitously tossed around as nouns. I love that he is as weird and specific as I am about certain issues. 🙂 The bunting sits over our pocket door looking into the guest room, so maybe Eli will notice his name when he’s on the changing table or sitting in the rocking chair.
So there you have it!
This concludes our tour as Eli prepares for his transition from womb to room. It certainly makes me happy every time I walk into this room, and I hope it’ll be calming to our little Taiter Tot as well.
As long as it took Ben and me to get our act together and get this nursery set up, I’m proud that we took the time to enjoy the journey rather than only focusing on the destination. As an overture to parenthood, I sure hope this bodes well for us!
*For the record, I know how to spell tater tot! But since Ben’s last name is Taitelbaum, I couldn’t pass up the opportunity to spell it in this more apropos way. I mean, have you SEEN all those puns in the nursery? I have a problem, I know.

Blessings to you and Ben as you welcome Eli to the world and to his awesome bedroom….I love all the personalized decorative touches. Jose and I send our love!
Thank you, Susie! Apparently, his bedroom is only awesome to adults — Eli isn’t quite warming up to his crib (or bassinet) at the moment! 🙂 All our best to you and Jose … sadly, I don’t think we’ll make it to the reunion in August, but we look forward to hearing all about it! 🙂